
About
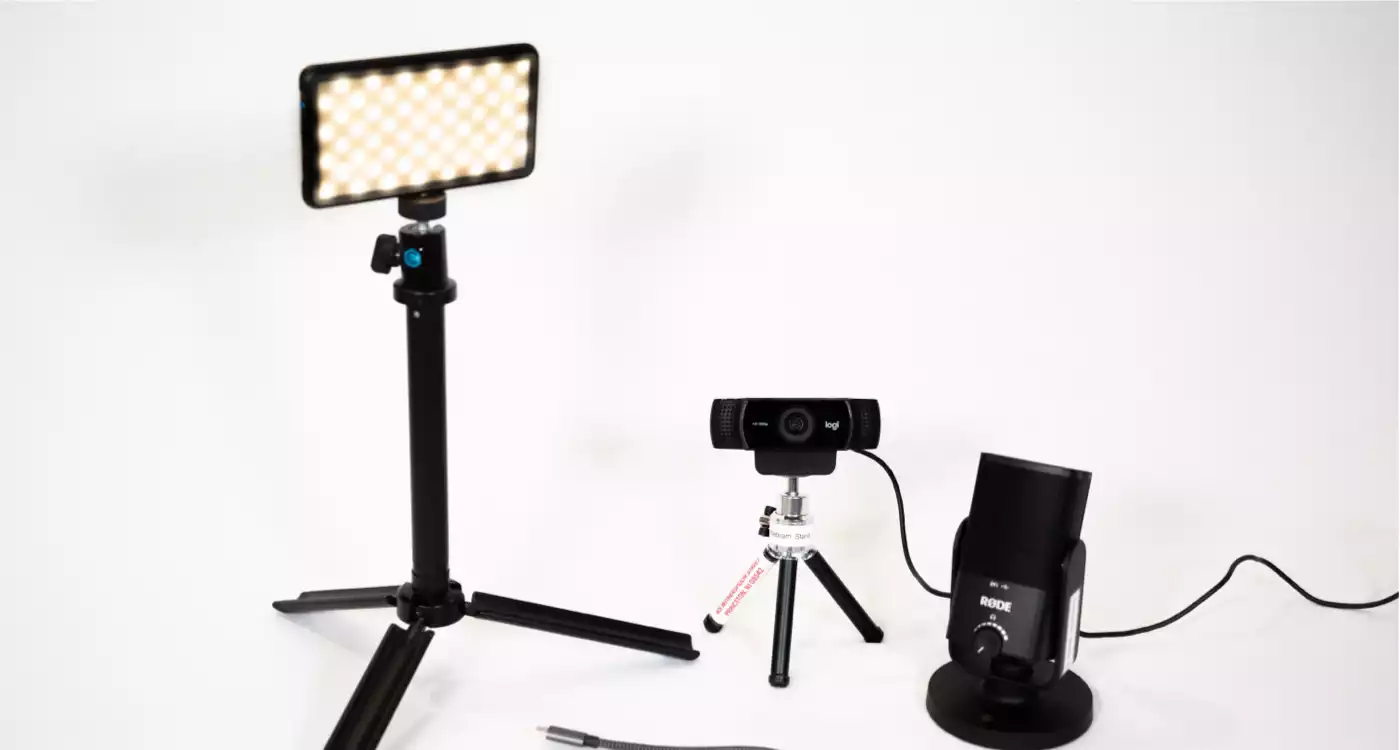
Use the Digital Creation Kit to upgrade your broadcasting and recording. This Kit contains a webcam to connect with superior clarity every time you go live; a microphone that is ideal for recording singing and musical performances in addition to spoken applications such as podcasting and voice-over; and lume cube to improve your desktop lighting.
Parts
Kit (Replacement Cost: $546 + $15 processing fee)
- Lume Cube with Stand ($100)
- Logitech Web Camera with Stand ( $100)
- Rode Microphone ($100)
- USBC Adaptor ($36)
- USB Adaptor ($10)
- 2 USBC Charging Cables ($10 each)
- Protective case ($40)
- Instruction Card
Instructions
Getting Started
- Logitec C922 Pro HD Stream Webcam with Tripod:
- Step 1: Mount the camera on your monitor/computer or on the provided tripod.
- Step 2: Plug the camera into your computer via USB. If your computer does not have a standard USB port, use the provided USB to USB-C adaptor.
- Step 3: Open the application you would like to use the Camera with. Examples include, Google Meet, Zoom, YouTube etc. Once the application has loaded, set the audio and video source to the C922 Pro Stream Webcam.
- RØDE NT-USB Microphone:
- Step 1: Plug the provided USB-C to USB cable into the back of the RØDE Microphone. Then plug into your computer or iPad. If your device does not have a standard USB port, use the provided USB to USB-C adaptor.
- Optionally, you can plug headphones into the back of the RØDE Microphone instead of using the speakers on your computer.
- Step 2: Open the application you would like to use the RØDE Microphone with. Examples include GarageBand, Audacity, Logic Pro X, or a virtual meeting platform such ation has loaded, set the audio source to the RØDE NT-USB Mini.
- Step 1: Plug the provided USB-C to USB cable into the back of the RØDE Microphone. Then plug into your computer or iPad. If your device does not have a standard USB port, use the provided USB to USB-C adaptor.
- Lume Cube Broadcast Lighting Kit:
- Turn on/off:
- Press and hold the BLUE power/mode button for 3 seconds to turn on the power or turn off the power. LED Lights up after power on.
- To charge the Lume Cube use the provided USB to USB-C Cable.
- Button Controls:
- Once the Lume Cube is on, tap the BLUE power/mode button to toggle between Brightness and Color Temperature controls on the LCD Display Screen, located on the back of the Lume Cube. The Mode indicator icon on the left of the LCD Display Screen will indicate what mode you are on.
- Push the (+) button to increase the brightness or color temperature value.
- Push the (-) button to decrease the brightness or color temperature value.
- Brightness Adjustability:
- The Lume Cube allows for full brightness adjustability to control the output of light. When on Brightness Mode, use your (+) or (-) buttons to increase or decrease brightness in 5% increments. The lowest you can go is 1% and the highest is 100%. At each brightness level, you’ll see the Estimated Run Time in hours in the top left corner.
- Color Temperature Adjustment:
- The Lume Cube offers fully adjustable color temperature to ensure you can capture the best content. When in Color Temperature Mode, you have the ability to adjust between 3200K and 5600K in 100K increments. Use the (+) or (-) buttons to increase or decrease the Color Temperature as needed.
- Turn on/off:
Ideas for Use
- Start or record a podcast. Learn more about producing podcasts with LinkedIn Learning Courses.
- Go live on platforms such as YouTube and Twitch. Learn more about live streaming and broadcasting with LinkedIn Learning Courses.
- Film and edit video content including films, ads, interviews, walk-through tours, vlogs and social media clips. Upgrade your videos with LinkedIn Learning Courses on topics including storyboarding, color correction and lighting.
- Connect to meetings and video chats.